Table of contents
Tables in LaTeX
Tables are used to envision the data in a structured way. It makes the information to become more presentable and easier to read. In this tutorial we are going to learn how to create simple and multi-page tables in LaTeX with customization in their rules and spacing, combining and colouring rows and columns, dealing with captions, references, cell width, positioning and omitting cells.
How do we create tables in LaTeX?
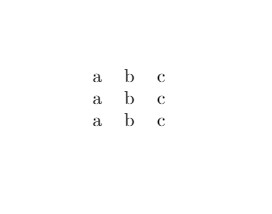
The tables in LaTeX can be created using the table environment and the tabular environment which uses ampersands (&) as column separators and new line symbols (\\) as row separators. The vertical lines (|) are passed as an argument and the letters l, c and r tell us whether we want to place the content in the left, centre or right respectively. Following is the code and result of a simple table created.
    \documentclass{article}
    \usepackage[utf8]{inputenc}
    \title{table}
    \begin{document}
    \begin{center}
        \begin{tabular}{ c c c }
            a & b & c \\
            a & b & c \\
            a & b & c \\
        \end{tabular}
    \end{center}
    \end{document}
Output of the above code
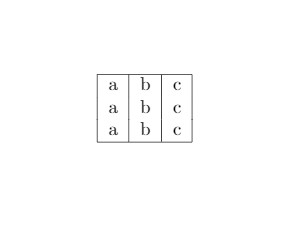
The \hline command is used to put a horizontal line on the top and bottom of
the table. Creating a table with boundaries is demonstrated below:
    \documentclass{article}
    \usepackage[utf8]{inputenc}
    \title{table}
    \begin{document}
    \begin{center}
        \begin{tabular}{ |c | c | c | }
        \hline
            a & b & c \\
            a & b & c \\
            a & b & c \\
        \hline
        \end{tabular}
    \end{center}
    \end{document}
Output of the above code
The number of times \hline command will be written is the number of horizontal
lines that will show between rows. Multiples entries of this command can be used to distinguish between the
headings of a column from its details. Tables can be created by providing a fixed length of the columns as
well
by providing the measurements between the vertical lines (|) where the arguments are passed
with the letters. Instead of l, c and r we use m, p and b for middle, top and bottom respectively. For
example,
{ |m{5em} |m{1cm} |m{1cm}| }
Creating multi-page tables
For creating multiple page tables in LaTeX the user needs to refer
to the package longtable. The tables are generated so that they can be broken down by
the LaTeX page breaking algorithm. The code uses four elements:
1.
\endfirsthead: the content above this command will appear at the beginning
of the table on the first page.
2. \endhead: the content put before
this command and below \endfirsthead will be displayed at the top of
the table on every page except the first one.
3. \endfoot: content
put after \endhead and before this command will appear at the bottom of
the table on every page except the last one.
4. \endlastfoot:
content after \endfoot and before this command will be displayed at the
bottom of the table but only in the last page where the table appears.
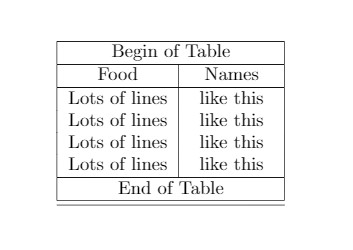
Example
of multi-page tables in LaTeX is shown below:
    \documentclass{article}
    \usepackage[utf8]{inputenc}
    \usepackage{longtable}
    \begin{document}
    \begin{longtable} [c] { | c | c | }
    \hline
    \multicolumn{2} { | c | }{Begin of Table}\\
    \hline
    Food & Names \\
    \hline
    \endfirsthead
    \hline
    \multicolumn{2} { | c | }{Continuation of Table}\ref{long}}\\
    \hline
    Food & Names\\
    \hline
    \endhead
    \hline
    \endfoot
    \hline
    \multicolumn{2} { | c | }{End of Table}\\
    \hline
    \endlastfoot
    Lots of lines & like this \\
    Lots of lines & like this \\
    Lots of lines & like this \\
    Lots of lines & like this \\
    \end{longtable}
    \end{document}
Output of the above code
Combining rows and columns
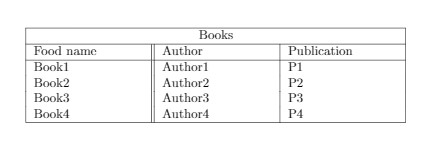
The command \multicolumn and \multirow are used to combine rows and columns in a table in LaTeX. Example of multi-column is demonstrated below:
    \documentclass{article}
    \usepackage[utf8]{inputenc}
    \begin{document}
    \begin{tabular} { | p {3 cm} | p {3 cm} | p {3 cm} | }
    \hline
    \multicolumn{3} { | c | }{Books}\\
    \hline
    Food name & Author & Publication \\
    \hline
    Book1 & Author1 & P1 \\
    Book1 & Author2 & P2 \\
    Book1 & Author3 & P3 \\
    Book1 & Author4 & P4 \\
    \hline
    \end{tabular}
    \end{document}
Output of the above code
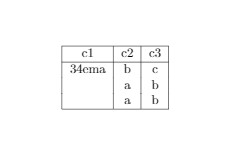
The example of multi-row is as follows:
    \documentclass{article}
    \usepackage[utf8]{inputenc}
    \begin{document}
    \begin{center}
    \begin{tabular} { | c | c | c | c | }
    \hline
     c1 & c2 & c3 \\
    \hline
    \multirow {3} {4em} {a} & b & c \\
    & a & b\\
    & a & b\\
    \hline
    \end{tabular}
    \end{center}
    \end{document}
Output of the above code
Captions, labels and references
There are three important commands used are as
follows:
1. \caption{}: this command is used to make a caption
for the table which is placed either above or below the table.
2.
\label{}: this command is used to refer a table within a
document.
3. \ref{}: this will be placed by the number corresponding
to the referenced table.
    \documentclass{article}
    \usepackage[utf8]{inputenc}
    \begin{document}
    \begin{table} [h!]
    \centering
    \begin{tabular}{ || c c c c || }
    \hline
    Col1 & Col2 & Col3 & Col4 \\ [0.5 ex]
    \hline \hline
    1 & 2 & 3 & 4 \\
    5 & 6 & 7 & 8 \\
    9 & 10 & 11 & 12 \\
    13 & 14 & 15 & 16 \\
    17 & 18 & 19 & 20 \\ [1ex]
    \hline
    \end{tabular}
    \caption{Table to test captions and labels}
    \label {table:1}
    \end{table}
    \end{document}
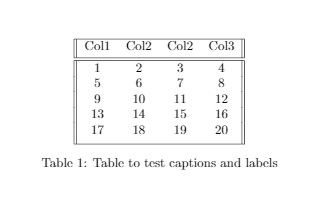
Output of the above code
Positioning a table
For a table to establish at what position it must be placed, a
parameter h! has to be placed in table environment. Few other parameters are passed
which are mentioned below:
1. h: the table will be placed here
approximately.
2. t: the table is placed at the top of the page.
3.
b:
table is placed at the bottom of the page.
4. p: put table on a special page for tables
only.
5. !: override external LaTeX parameter
6. H: place the table
at a
precise
location
7. \centering: centres the table.
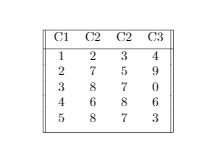
Below is an
example of a table is placed here
    \documentclass{article}
    \usepackage[utf8]{inputenc}
    \begin{document}
    \begin{table} [h!]
    \centering
    \begin{tabular}{ || c c c c || }
    \hline
    C1 & C2 & C3 & C4 \\ [0.5ex]
     \hline
    1 & 2 & 3 & 4 \\
    2 & 7 & 5 & 9 \\
    3 & 8 & 7 & 0 \\
    4 & 6 & 8 & 6 \\
    5 & 8 & 7 & 3 \\ [1ex]
    \hline
    \end{tabular}
    \end{table}
Output of the above code
Colouring a table
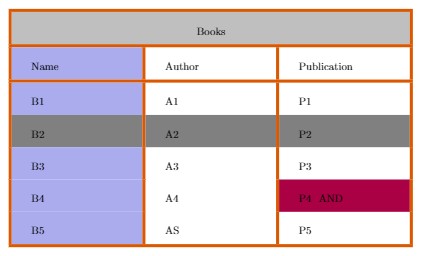
This section includes colouring a row, column, cell and lines. Below explains
how:
1. Colour of the lines: In LaTeX a line is
coloured using the command \arrayrulecolor.
2. The
background colour of a cell: the command \cellcolor is
used to set the background colour of a cell. The name of the colour can be set inside
the braces or pass a format parameter inside brackets and then set the desired colour
inside the braces using the format.
3. The background colour of a
row: the command \rowcolor is the background colour of a
row.
4. Background colour of a column: the command
\newcolumntype{s}{>{\columncolor[HTML]{AAACED}} p{3cm}} is used background colour of
column.
    \documentclass{article}
    \usepackage[utf8]{inputenc}
    \usepackage[table]{xcolor}
    \setlength{\arrayulewidth}{1mm}
    \setlength{\tabcolsep}{18pt}
    \renewcommand{\arraystretch}{2.5}
    \newcolumntype{s}{>{\columncolor[HTML]{AAACED}} p{3cm}}
    \arrayulecolor[HTML]{DB5800}
    \beging{document}
    \begin{tabular} { |s|p{3cm}|p{3cm}| }
    \hline
    Name & Author & Publication \\
    \hline
    B1 & A1 & P1 \\
    \rowcolor{gray}
    B2 & A2 & P2 \\
    B3 & A3 & P3 \\
    B4 & A4 & P4 \cellcolor [HTML]{AA0044} AND \\
    B5 & A5 & P5 \\
    \hline
    \end{tabular}
    \end{document}
Output of the code above
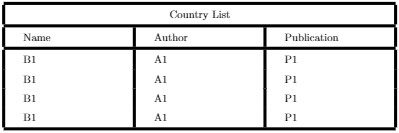
Line width and Cell padding
The commands that are used are as following:
1.
\setlength{\arrayrulewidth}{1mm}: sets the thickness of the borders of the
table.
2. \setlength{\tabcolsep}{18pt}: space between text and
left/right border of its containing cell is set to 18pt with this command.
3.
\renewcommand{\arraystretch}{1.5}: height of each row is set to 1.5
relatives to its default height.
    \documentclass{article}
    \usepackage[utf8]{inputenc}
    \setlenght{\arrayulewidth}{1mm}
    \setlength{\tabcolsep}{18pt}
    \renewcommand{\arraystretch}{1.5}
    \begin{document}
    \begin{tabular}{ |p{3cm}| p{3cm}| p{3cm}| }
    \hline
    \multicolumn{3}{|c|}{Country List} \\
    \hline
    Name & Author & Publication \\
    \hline
    B1 & A1 & P1 \\
    B1 & A1 & P1 \\
    B1 & A1 & P1 \\
    B1 & A1 & P1 \\
    \hline
    \end{tabular}
    \end{document}
Output of the above code
